Hello and Welcome!
In this article, we will go over how to use CI/CD pipeline to deploy infrastructure into AWS utilizing an IaC.
Overview
As DevOps and SRE engineers, we ideally want to automate the deployment of infrastructure, applications and code. For an SRE Engineer, that is our mantra - automate everything.
This is where Infrastructure as Code comes in. Infrastructure as Code, or IaC, is the process of managing and provisioning data-centers or Cloud infrastructures through machine-readable definition files. Generally, IaC can be used as a source of truth and version controlling.
When it comes to deployment, you have Configuration Management and Orchestration. Configuration Management tools are primarily used to deploy and manage software, but can also be used to deploy infrastructure. Some examples include Ansible, Puppet and Chef.
Orchestration tools are used primarily to provision infrastructure. For orchestration tools, there are native tools for cloud services, such as AWS Cloudformation, Azure Resource Manager, Google Cloud Deployment Manager and open source tools like Terraform or Pulumi.
In this article, we will use A popular IaC open source orchestration tool called Terraform that will be used to generate the infrastructure and implemented directly through a CI/CD. Terraform is a great tool that is used for creating, changing, and versioning infrastructure safely and efficiently.
Terraform uses State Files, which keeps track of resources created by configuration and maps them to real-world resources.
State files must be preserved for later reference, modification, or destruction by subsequent deployments to a durable backend. Backends can be local or remote in something like s3. When working with multiple engineers, it is often a good practice to store it remotely.
Now, as said before as an SRE we want to automate everything. So how do we automate Terraform?
There are several solutions. There are open source tools like Atlantis, but the most efficient way would be through a CI/CD platform.
For this solution, we will use two AWS services to form the foundation of the CI/CD pipeline. For Continuous Delivery, we will use AWS CodePipeline. For Continuous Integration (CI), We will use AWS CodeBuild.
CodePipeline will help us automate our release pipeline through build test and deployment. CodeBuild compiles source code, runs tests, and produces software packages that are ready to deploy.
Architecture
Naturally, when it comes to creating this, there will be several AWS services that we will need to use.
These include:
- IAM Roles and Policies
- AWS CodePipeline
- AWS CodeBuild
- S3
- DynamoDB Table
- Container Registry
Outside of AWS, we will be using Terraform and GitHub.
When we are finished, this is what our infrastructure will look like:

Requirements
Naturally, there are some requirements in order to get started. We will not go over how to do these requirements, but I will list them below.
First, you'll need an AWS account and have your aws config and credentials configured on your local machine.
Second, you will need a Github account.
Third, you will need terraform on your local machine.
Alright, lets get started.
Build out
Our first stop will be in Github. We'll want to create a repository that will store our terraform IaC that will be used to deploy infrastructure to AWS from the Pipeline.
To save some time, here is a Example repository.
let's take a look at the repository. Reviewing main.tf, we see that we'll be deploying vpc's into AWS. Reviewing variables, you will see the CIDR and vpc names.
There are two other significant files - terraform_plan.yml and terraform_apply.yml. These are the buildspec's that will be used to plan and apply infrastructure to AWS using AWS Codebuild. They are required to be in the root directory; however, you can specify a separate subdirectory by using subdirectory/yml file. Without these files, AWS Codebuild will fail.
lastly, let's take a look at our provider.tf. Note that we do not have a backend. This will need to be created.
Let's go ahead and do that now.
Like everything else, we want to automate deployment. For this, we will use terraform.
On your local machine, create a main.tf file. In here, we will create a s3 bucket and DynamoDB Table that will be used to store our state file and locks. In aws_s3_bucket resource, replace terraform_state_bucket_name with a name for your bucket. In aws_dynamodb_table resource, replace app-state with an easily identifiable name.
provider "aws" {
    region = "us-east-1"
}

terraform {
    required_providers {
      aws = {
        source   = "hashicorp/aws"
        version  = "~> 3.0"
      }
    }
}

resource "aws_s3_bucket" "terraform_state"{
    bucket      = "terraform_state_bucket_name"

    lifecycle {
      prevent_destroy = true
    }
}

resource "aws_s3_bucket_versioning" "terraform_state" {
    bucket = aws_s3_bucket.terraform_state.id

    versioning_configuration {
      status = "Enabled"
    }
}

resource "aws_dynamodb_table" "terraform_state_lock" {
  name           = "app-state"
  read_capacity  = 1
  write_capacity = 1
  hash_key       = "LockID"

  attribute {
    name = "LockID"
    type = "S"
  }
}
now run terraform init, terraform apply. Congrats, you now have a backend s3 for your state file and DynamoDB table for your lock files.
Let's add this to your repository. Go ahead and fork the example repository to your own repository, then clone it to your local machine.
Now, in the provider.tf file, let's update this with our backend information.
terraform {
  backend "s3"{
    bucket          = "terraform_state_bucket_name"
    key             = "terraform.tfstate"
    region          = "us-east-1"
    dynamodb_table  = "app-state"
  }
}
Note our key. A key is a path to the state file inside the S3 Bucket. Here, we call it terraform.tfstate. This does not exist yet, so terraform will create it later on.
Creating our CI/CD Pipeline
Alright. now that we have our backend created, we are ready to move forward with building our pipeline. This can be done two ways - manually through AWS console or through IaC. Naturally as a SRE we want to automate everything.
Once again, we will spec it out using terraform. Again, to save time we do have a repository with the files. Feel free to fork and clone this to your local machine.
Like a good engineer, let's go over what we are exactly building.
Main tf file
A review of main.tf will show that it is pretty busy. Lots of resources and information to digest. Let's dissect this a little to understand better what we're attempting to accomplish.
IAM Roles and Policy
We require an IAM Role for AWS CodePipeline and CodeBuild to use to assume to deploy infrastructure. Secondly, we need a policy that will grant this role some list, Get and Put access to our s3 buckets. Finally, we are giving the Role Power User Access to deploy the infrastructure.
Naturally, you may want to restrict this access further. For example, we could create IAM policies for multiple pipelines designed and restrict those policies to only implement ec2, eks or ecs deployments, or only deploy network infrastructure or to deploy IAM. However, for this project we are using one pipeline and as such, we will use Power User Access.
s3 buckets
Here, we are creating two buckets - one for the Pipeline to store artifacts and one for CodeBuild to store cache files. We are creating a private ACL and enabling versioning.
resource "aws_s3_bucket" "bucket" {
  bucket = "tf-pipeline"
}

resource "aws_s3_bucket_acl" "acl" {
  bucket = aws_s3_bucket.bucket.id
  acl    = "private"
}

resource "aws_s3_bucket_versioning" "versioning" {
  bucket = aws_s3_bucket.bucket.id
  versioning_configuration {
    status = "Enabled"
  }
}

resource "aws_s3_bucket" "cb_bucket" {
  bucket = "tf-pipeline-cb"
}

resource "aws_s3_bucket_acl" "cb_acl" {
  bucket = aws_s3_bucket.cb_bucket.id
  acl    = "private"
}

resource "aws_s3_bucket_versioning" "cb_versioning" {
  bucket = aws_s3_bucket.cb_bucket.id
  versioning_configuration {
    status = "Enabled"
  }
}
CodePipeline
lets break down the CodePipeline and review what it is doing.
First, we need to assign the above IAM role to our CodePipeline. This is done using role_arn = aws_iam_role.role.arn. This will allow CodePipeline to read and write to the s3 buckets.
resource "aws_codepipeline" "codepipeline"{
  name = "terraform-pipeline"
  role_arn = aws_iam_role.role.arn
Next, we need to identify where we are storing our Artifacts. CodePipeline integrates with development tools to check for code changes and then build and deploy through all of the stages of the continuous delivery process. Stages use input and output artifacts that are stored in the Amazon S3 artifact bucket. For the CodePipeline, we will store them in the tf-pipeline bucket. Note further in we use the same input artifact as the output artifact from the source stage.
resource "aws_codepipeline" "codepipeline"{
  name = "terraform-pipeline"
  role_arn = aws_iam_role.role.arn

  artifact_store {
    location = aws_s3_bucket.bucket.bucket
    type     = "S3"
  }
Alright, on to stages. We will be using three stages for the CodePipeline.
Our first stage is our source. Source is where CodePipeline will see changes and implement them. For this, we will use GitHub version 2. To implement version 2, we use aws codestarconnections. We also have a variable for the repository name. This can be updated in the variables.tf.
Note further down that we have a resource that defines the codestarconnection as Github. When this terraform is deployed, you will need to set up the connection manually. We'll go over how to do that later.
  stage {
      name = "Source"

      action {
        name             = "Source"
        category         = "Source"
        owner            = "AWS"
        provider         = "CodeStarSourceConnection"
        version          = "1"
        output_artifacts = ["source_output"]

        configuration = {
          ConnectionArn    = aws_codestarconnections_connection.tf-pipeline.arn
          FullRepositoryId = var.repositoryid
          BranchName       = "main"
        }
      }
    }
The second stage is AWS CodeBuild. In this stage, we have two actions. Our first action will be to use CodeBuild to read the artifact and run the codebuild project that will run Terraform Plan. The second happens after Terraform Plan is ran. Here, we are seeking approval, which is done manually. This action must be approved before the next stage runs.
  stage {

    action {
      name             = "Terraform_Plan"
      category         = "Build"
      owner            = "AWS"
      provider         = "CodeBuild"
      input_artifacts  = ["source_output"]
      output_artifacts = ["tfplan_output"]
      version          = "1"

      configuration    = {
        ProjectName    = aws_codebuild_project.terraform_plan.name
      }
    }

    name = "Terraform_Plan"
    action {
      name             = "Terraform_Plan_Manual_Approval"
      category         = "Approval"
      owner            = "AWS"
      provider         = "Manual"
      version          = "1"
    }

  }
The third stage is also AWS CodeBuild. In this stage, we use CodeBuild to read the artifact and run the codebuild project that will run Terraform Apply.
  stage {
    name = "Terraform_Apply"
    action {
      name             = "Terraform_Apply"
      category         = "Build"
      owner            = "AWS"
      provider         = "CodeBuild"
      input_artifacts  = ["source_output"]
      version          = "1"

      configuration    = {
        ProjectName    = aws_codebuild_project.terraform_apply.name
      }
    }
  }
Finally, we have the CodeBuild projects. There are two of them - one for Terraform Plan and one for Terraform Apply. Both projects are essentially the same, with some minor changes.
Both use the same service role as CodePipeline and both store the cache in the s3 bucket tf-pipeline-cb. Both implement a general1 small container registry that pulls in a yaml file. Both use an environment variable. The key differences here is that one runs a Plan while the other runs Apply.
resource "aws_codebuild_project" "terraform_plan" {
  name         = "Terraform-Plan"
  service_role = aws_iam_role.role.arn

  artifacts {
    type = "CODEPIPELINE"
  }

  environment {
    compute_type    = "BUILD_GENERAL1_SMALL"
    image           = "aws/codebuild/standard:3.0"
    type            = "LINUX_CONTAINER"
    privileged_mode = true
    environment_variable {
      name  = "TF_COMMAND_P"
      value = "plan"
    }
  }
  cache {
    type     = "S3"
    location = "${aws_s3_bucket.cb_bucket.bucket}/terraform_plan/cache"
  }
  source {
    type      = "CODEPIPELINE"
    buildspec = "terraform_plan.yml"
  }
}
resource "aws_codebuild_project" "terraform_apply" {
  name         = "Terraform-Apply"
  service_role = aws_iam_role.role.arn

  artifacts {
    type = "CODEPIPELINE"
  }

  environment {
    compute_type    = "BUILD_GENERAL1_SMALL"
    image           = "aws/codebuild/standard:3.0"
    type            = "LINUX_CONTAINER"
    privileged_mode = true
    environment_variable {
      name  = "TF_COMMAND_A"
      value = "apply"
    }
  }
  cache {
    type     = "S3"
    location = "${aws_s3_bucket.cb_bucket.bucket}/terraform_apply/cache"
  }
  source {
    type      = "CODEPIPELINE"
    buildspec = "terraform_apply.yml"
  }
}
Alright, that was a lot to process. Before we deploy this, we need to make some updates to our pipeline repo.
provider.tf
Before we run Terraform, we will need to update our backend. let's update this with our backend information.
terraform {
  backend "s3"{
    bucket          = "terraform_state_bucket_name"
    key             = "terraform-pipeline.tfstate"
    region          = "us-east-1"
    dynamodb_table  = "app-state"
  }
}
Notice that our key has changed. For the pipeline deployment, we will use a different tf state file over the one used for our example repo. This will keep any changes we make between the two separated and maintainable. If we use the same key, we will cause drift and taint as the example repo and pipeline repo are not together.
Deployment
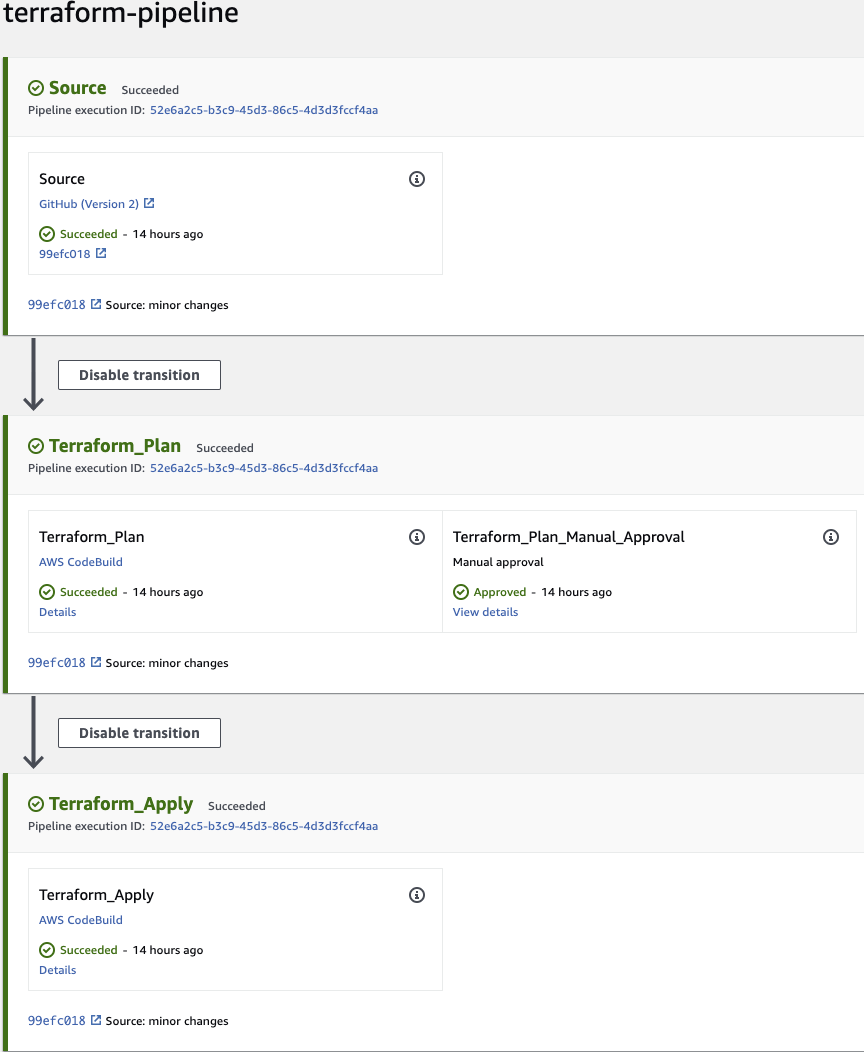
Alright, we are ready to run Terraform. With the changes made, lets run Terraform. Once deploy, go to AWS console and you should see something like this:
Now, we will need to set up that connection. In AWS, click on Edit. One Source Stage, click edit stage.


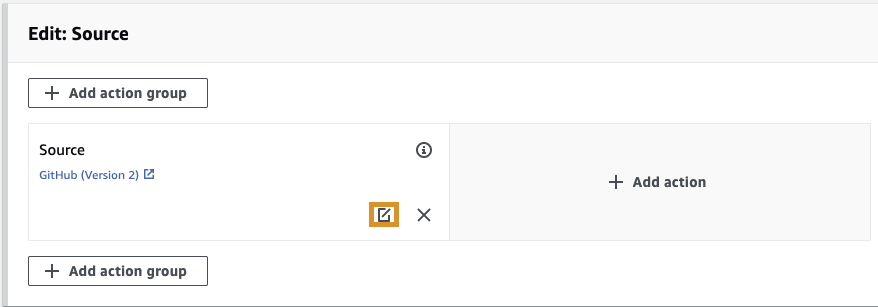
Click on connect to GitHub. Give the connection a name and click on Connect to Github. Follow the directions to authorize access and select the Example Repository with the VPC's that we want to deploy.
And that is it. The Pipeline should begin a release and run through the process. Remember that you'll need to manually approve before running the Apply. If it does not automatically run the release, click on Release Change.
Once this has finished running, jump over to the VPC section of your aws console and you should see two new VPC's

Recap
In this article, we deployed a s3 backend and our CI/CD pipeline using Terraform. We connected our Source Stage to GitHub and ran the pipeline to successfully deploy two new VPC's.
Thank you for reviewing my article. Let me know if you have any questions and until next time!